OpenSSH: Public Key Authentication konfigurieren

Key generieren:
ssh-keygen -b 2048 -t rsa
erzeugt in ~/.ssh die Dateien id_rsa und id_rsa.pub
Achtung! Dabei auf eine Passphrase zu verzichten, bedeutet ein erhebliches Sicherheitsrisiko. Falls der private Key in fremde Hände gerät, kann weltweit von jedem System aus ein ssh-Zugang eingeleitet werden.
Zusätzlich kann man bei Bedarf mit dem Parameter -f $DATEINAME bestimmen wie die Dateinamen des neu erzeugten Schlüsselpaars heissen sollen.

"Authorization" Datei sicher anlegen:
Datei ~/.ssh/authorized_keys anlegen und auf mode 600 setzen:
touch ~/.ssh/authorized_keys ; chmod 600 ~/.ssh/authorized_keys

Authorization Datei füllen:
Public Keys vertrauenswürdiger Rechner in die authorized_keys aufnehmen, ein Key pro Zeile, z.B. mit
cat ~/.ssh/id_rsa.pub >> ~/.ssh/authorized_keys

Windows-Clients
Privaten Key ( id_rsa ) auf den Client-PC  kopieren, z.B. mit SFTP oder WinSCP.
Bei der Verwendung von PuTTY muß der Key in das PuTTY-eigene Format *.ppk umgewandelt werden. Dazu verwendet man das Programm PuTTYgen mit der Funktion "Import Key". Anschließend den Key über "Save private key" sichern.
Programme:      PuTTY     PuTTY-Hilfe     PuTTYgen


FreeSSHD: Public Key Authentication konfigurieren

Step 1
Open freesshd settings and locate "Public key authentication" in
SSH->Authentication. Set it to "Allowed" or "Required", whatever you prefer.

Step 2
On the same option page look for "Path for public keys". This is the folder where you will keep your public keys. Default value is "$HOME\ssh_public_keys". So, when you try to logon, freesshd will search for you public key in "C:\Documents And Settings\Login\ssh_public_keys\". You can select any other folder, just make sure it exists.

Step 3
Generate keys using PuTTYgen. Save your private key wherever you want, but somewhere safe, of course. Now, use a text editor (Notepad will do) to create a file in your public key folder. Copy the OpenSSH public key from PuTTYgen screen and paste it into this new file. Save it with a name same as your login.

Step 4
Now just use PuTTY to connect using your private key. You just select your private key file under Connection->SSH->Auth and that's it.


 OpenSSH as a secure Web proxy

 Quelle: OpenSSH as a secure Web proxy

Transparent Proxy Server

  • configure the firewall on your home network to forward an SSH port to the computer you will use as your transparent proxy
  • configure your firewall to accept SSH connections on port 2200 and forward them to port 22 on a UNIX-like system on your internal network
  • Make sure you secure SSH against common brute-force password cracking attacks on your proxy server.
  • Make sure that your server has HTTP access to the Internet through the firewall.
  • Dynamic IP address: use Dyndns-client like ez-ipupdate

Encrypted proxy connection

  • UNIX-like operating system such as Debian GNU/Linux or FreeBSD
  • Example: stable home IP address of 25.10.101.250
  • Creating your encrypted proxy connection involves entering a command such as this:
      $ ssh -D 8080 -p 2200 username@25.10.101.250
  • "username” : name of a normal user account on the proxy server at home
  • This command creates a local transparent proxy on port 8080 that then forwards all traffic it receives to 25.10.101.250 on port 2200.
  • Browser configuration: Manual Proxy Configuration - Socks-Proxy
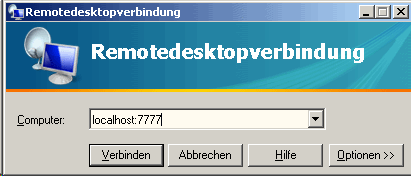
  localhost:8080.
    If for some reason it doesn’t work with “SOCKS v5,” try switching to “SOCKS v4.” 


 Quelle: Use PuTTY as a secure proxy on Windows

First, configure a PuTTY session to connect to the UNIX/Linux system you will use as your proxy server. Fill in the following data:

  1. Host Name (Or IP Address): This may be the domain name for your network, if you have domain name resolution via a dynamic DNS service or other means set up to allow access to your network via a domain name, or it may be the IP address for your router/firewall.
  2. Port: SSH normally uses port 22, but this may be different, depending on how port forwarding may be set up on your trusted network.
  3. Protocol: Select the SSH option.

Second, configure an SSH encrypted tunnel through which your HTTP requests can be forwarded to the system you’re using as a proxy server. 
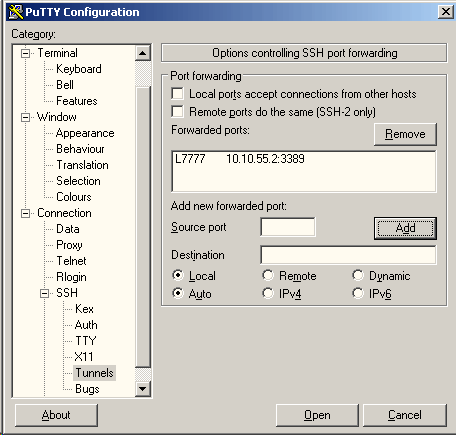
Open the Connection > SSH > Tunnels interface using the hierarchical Categories pane on the left-hand side of the PuTTY dialog box, and fill in this data:

  1. Source Port: Fill in a port number that will be used locally, on the laptop, for this connection. For instance, you might use port 8080 for forwarded HTTP requests.
  2. Destination: Leave the text field empty. Select the Dynamic and Auto options.
     img1.gif
  3. Provide Username, save session, establish connection.

Third, configure Firefox to use your encrypted connection. Open the Options dialog box from the Tools menu, then select Advanced. Make sure the Network tab is selected, and click the Settings button. Fill in the following data:

  1. Configure proxies to access the Internet: Select Manual Proxy Configuration.
  2. SOCKS Host: Enter 127.0.0.1 into the text field.
  3. Port: For the SOCKS Host, fill in the same port number you specified in the PuTTY tunneling dialog — 8080 in the above example.


SSH-Tunnel zu Hostonly-VM

Quelle: Server in Einzelhaft (c't 1/2009 S.172)

VM-Server-PC

  • SSH-Server installieren, z.B. FreeSSHD oder Cygwin
  • Beispiel: Host-NIC mit IP 192.168.0.44, virtuelle NIC (hostonly) mit IP 10.10.55.1, NIC in VM mit 10.10.55.2
  • Firewall Host-PC: Ausnahme für SSH-Port 22 festlegen
  • FreeSSHD konfigurieren: berechtigte Nutzer anlegen, Authorization, Einstellung "Shell" und "Tunneling" zulassen, "Allow local port forwarding"

Virtuelle Maschine

  • Fernsteuerungssoftware installieren bzw. konfigurieren, z.B. Remote Desktop aktivieren
  • Firewall einstellen: Ausnahmen für RDP, VNC o.ä.

Client-PC

  • Beispiel: IP 192.168.0.20
  • SSH-Client konfigurieren, z.B. Putty
  • Verbindung zu Host-PC erstellen (192.168.0.44, port 22)
  • Connection-SSH-Tunnels: Source-Port z.B. 7777, Destination  10.10.55.2:3389  (für RDP)
    img2.gif
  •  SSH-Verbindung aufbauen
  • RDP-Sitzung aufbauen zu Host localhost:7777
     img3.gif


Links zu SSH
http://linuxwiki.de/OpenSSH   http://cygwin.com   http://www.freesshd.com   http://www.bitvise.com/tunnelier


Zurück